
Growing microgreens at home could be your perfect solution if you’re looking for a healthy, sustainable, and easy way to boost your meals with fresh greens. These tiny, nutrient-packed plants are bursting with flavor vitamins, and minerals. Plus, they’re incredibly easy to grow, require minimal space, and can be harvested in just a few weeks.
In this step-by-step guide, we’ll show you how to grow microgreens at home, including everything you need to know about soil, seeds, containers, and harvesting. Whether you’re a seasoned gardener or a total beginner, you’ll find everything you need to get started and enjoy your very own homegrown greens in no time.
What Are Microgreens?
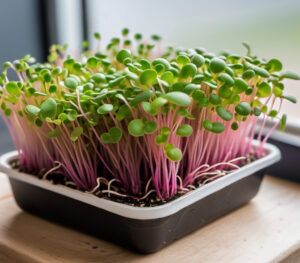
Microgreens are the young seedlings of various vegetables and herbs, harvested at an early stage in their growth. They typically grow to be between 1 to 3 inches tall and are harvested before they fully mature. These mini greens are packed with nutrients, antioxidants, and vitamins, making them a superfood that’s easy to add to salads, sandwiches, smoothies, and more.
Common microgreens include:
- Radish
- Broccoli
- Cilantro
- Mustard greens
- Peas
- Sunflower
- Arugula
Each microgreen variety has its unique flavor and texture, offering endless possibilities for your homegrown greens.
Why Grow Microgreens at Home?
Growing microgreens at home comes with many benefits:
Fast Growth: Microgreens can be harvested in as little as 7-14 days, depending on the variety.
Space-Efficient: You don’t need a large garden to grow them. A small windowsill, countertop, or shelf can be all you need.
Healthy and Nutritious: Microgreens contain high concentrations of vitamins, minerals, and antioxidants that are often greater than their mature counterparts.
Low Maintenance: Growing microgreens is relatively easy and doesn’t require advanced gardening skills.
Essential Supplies for Growing Microgreens
Before diving into the step-by-step guide, here’s a list of everything you’ll need to grow microgreens at home:
Microgreens Seeds: Choose from a wide variety of microgreens, such as basil, broccoli, or radish. Many seed companies sell microgreens-specific seeds, but regular vegetable seeds can work too.
Growing Tray: A shallow tray with drainage holes is ideal for growing microgreens. If you don’t have a special microgreen tray, a regular seedling tray or even a small container can work.
Potting Soil: A fine, loose potting mix is perfect for microgreens. Avoid soil with added fertilizer or moisture-retaining crystals, as microgreens don’t require much soil.
Water: A gentle spray bottle or a watering can with a fine spout is recommended to water your microgreens without disturbing the soil.
Light: Microgreens need plenty of light to grow. Ideally, place them near a sunny window, or consider using grow lights if you don’t have enough natural sunlight.
Now that you’ve got everything ready, it’s time to start growing!
if you need information about how to guide for no-dig gardening then check out this
Step-by-Step Guide on How to Grow Microgreens at Home
Step 1: Choose the Right Seeds
The first step to growing microgreens is selecting the seeds you want to grow. You can choose from a variety of greens, including leafy vegetables like kale, lettuce, and arugula, or herbs like basil and cilantro.
For beginners, radishes, sunflowers, and peas are popular options because they grow quickly and are easy to care for. If you’re growing microgreens for the first time, start with one or two varieties until you feel comfortable with the process.
Step 2: Prepare the Growing Tray
Select a shallow tray or container that is at least 1-2 inches deep. Make sure the container has drainage holes to prevent water from accumulating at the bottom, which could cause root rot.
Fill the tray with a fine potting mix, leaving about half an inch of space at the top. Gently level the soil using your fingers or a small tool to ensure an even surface.
Step 3: Sow the Seeds
Once your tray is ready, it’s time to sow the seeds. Microgreens require a dense sowing pattern, as they grow best when they’re planted close together. Sprinkle the seeds evenly across the surface of the soil, ensuring that the seeds are spread out but not clumped together.
For larger seeds like sunflower or pea shoots, plant them slightly further apart, but for small seeds like radish or broccoli, you can sow them quite densely. Press the seeds lightly into the soil using your hand or a flat object to ensure good seed-to-soil contact.
Step 4: Water the Seeds
Once the seeds are sown, gently water the soil using a fine mist or watering can. Make sure the soil is evenly moist but not soaked. Keeping the soil moist but not soggy is the aim. Overwatering can lead to mold growth, so it’s important to water carefully.
Step 5: Provide the Right Conditions
Microgreens need the right environment to thrive. They prefer temperatures between 60-75°F (15-24°C) and plenty of light. If you’re growing your microgreens indoors, place the tray near a sunny window with at least 4-6 hours of direct sunlight each day.
If you don’t have enough natural light, you can use grow lights to provide the necessary light intensity. Position the lights about 6-12 inches above the microgreens and leave them on for about 12-16 hours a day.
Step 6: Maintain Moisture and Temperature
Keep the soil consistently moist throughout the growing process, but make sure the trays have proper drainage to avoid any water accumulation. If the top of the soil looks dry, water it again gently.
Maintain a warm environment, ideally between 65-70°F (18-21°C). If your home is particularly dry, you might want to cover the tray with a clear plastic lid or a damp towel to retain humidity. Just remember to remove the cover once the seeds begin to sprout to prevent mold growth.
Step 7: Thin the Microgreens (Optional)
As your microgreens start to sprout, they may be very close together. If you notice they are overcrowded, you can thin them by gently pulling out a few of the smaller seedlings. This helps prevent them from competing for light and nutrients and allows the remaining plants to grow stronger.
However, thinning isn’t necessary for all types of microgreens, so use your judgment based on how dense the crop appears.
Step 8: Harvest Your Microgreens
Depending on the type of microgreen you’re growing, it will take anywhere from 7 to 21 days to reach maturity. You’ll know they’re ready for harvest when the leaves have fully developed, and the greens are around 1-3 inches tall.
To harvest, use clean scissors or shears to cut the microgreens just above the soil line. Be sure to cut them when they’re still tender and fresh for the best flavor and nutrition. Some microgreens can be harvested multiple times, but generally, they’re best enjoyed in their first growth cycle.
Step 9: Enjoy Your Microgreens!
Once harvested, your microgreens are ready to eat! Use a paper towel to wipe them dry after giving them a gentle rinse in cool water. Use them as a garnish on salads, sandwiches, soups, or even smoothies.
Not only will they add a burst of flavor to your meals, but you’ll also enjoy the nutritional benefits of these powerhouse greens.
Tips for Success in Growing Microgreens
Use Fresh Seeds: For optimal germination, always use fresh seeds. Old or improperly stored seeds may not sprout properly.
Start Small: If you’re a beginner, start with just a few trays of microgreens. Once you get the hang of it, you can expand to more varieties.
Keep an Eye on Light: Without enough light, microgreens can become leggy and weak. Make sure they get enough light to grow strong and healthy.
Avoid Fertilizer: Microgreens don’t need much fertilizer. Most commercially available potting soil should provide them with all the nutrients they need for the short growing period. if you need further information then check out this
Boost Your Microgreen Blog’s Visibility with SEO
If you’re sharing your journey of growing microgreens at home or offering tips and recipes online, SEO (Search Engine Optimization) is a must to help your content reach a wider audience. SEO strategies can significantly improve your site’s visibility in search results, driving more traffic to your gardening blog or website. Whether you’re writing about your microgreen growing process, recipes, or health benefits, proper SEO techniques can help you rank higher in search engine results and attract more readers.
To take your blog or website to the next level, consider using this SEO service. With expert SEO support, you can enhance your content’s searchability, increase organic traffic, and gain a loyal following of fellow gardening enthusiasts. Start optimizing today for better online visibility and more engagement with your microgreen content!
Final Thoughts
Growing microgreens at home is an easy, rewarding, and fun way to enjoy fresh, nutritious greens all year round. With a little patience and care, you can have a bountiful harvest of microgreens right from your kitchen counter. So whether you’re looking to improve your diet, save money, or add some vibrant flavor to your meals, this guide has given you all the tools you need to start your microgreen garden at home.
Give it a try and watch your homegrown greens flourish!


1 thought on “How to Grow Microgreens at Home”